What was really beneficial in this unit is that I feel a lot more confident in modeling and feel I have a basic understanding which I can now improve upon. I did start to enjoy it, the process is extremely time consuming and repetitive but I'm sure like when creating a good drawing the feeling is extremely satisfying when finished. I will carry on and finish this character and then from then hope to model more characters basic to begin with and eventually more complex.
Feedback
I still need to complete the head I have had some experience of creating a face before so it shouldn't be to hard. I also need to spend some time making the character much more organic, I will watch some video tutorials on topology to help me. I will also read over some of the sections of the book again.
Modeling the character
First off all I had to go into edit then Duplicate special and set geometry type to instance and group under world mode.
The duplicate special would enable me to work on a single side of the model and every action I performed would be mirrored which would save time.

Before I began modeling I had messed up the image plains. I think some how I had linked the polygon to the image plain. so as I zoomed in to the polygon the image plain would disappear.

I figured out the problem I just began again and followed the steps this time it worked the image plains were locked and the polygon was behaving normally.

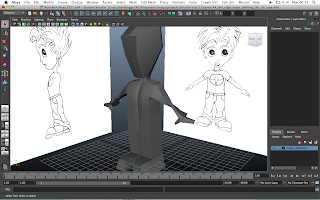
I began shaping the Torso navigating between the different perspectives, I usually match the model up with the front image and then side, while also checking the perspective mode. No problems so far. I had previously messed around with vertices while attempting to model a face so i understood in basic terms how they worked through the xyz axis.

I selected the two faces on the bottom left and right side of the torso then extruded them to make the basis of the thigh.

I then extruded the face down to the foot, each time I extruded a knew edge and set of vertices were created. I used the side and front shot to align the model with the image plain. I further extruded the faces to make the basic feet.

Inserted two extra edge loops in the chest, Edge loops allows you to add further shape to your model, it also wraps around the whole model unlike split polygon tool.

Using the faces again I extruded to create the arms, The angle was wrong so I altered the vertices. maybe I should have used the rotate tool instead of the vertices but I'm more comfortable doing it like that.

Extending the arm by extruding and matching it up with the reference.

Here is were I ran into some problems, the book explained the way in which the arm twists which it naturally does, however I couldn't quite match my arm model with the book reference. I tried my best but felt this wasn't quite right. I spend ages thinking what was wrong in the end I manipulated the vertices but still feel it wasn't the correct way to do it. I added in extra edge loops to form the fingers and to add more detail to the arm.

Creating more split polygons I was able to extrude the fingers. To the largest knuckle to the smallest. I could tell something had gone wrong the hand looked slightly like my reference but it wasn't perfect and I will have to go back to this at a later stage. I scaled down the face at the end of the finger to gain the right proportion.

Following the book I selected a single face and extruded it until it made a thumb. I could tell that it wasn't quite right but wanted to carry on and return to the mistakes after more progress had been made. I did try for a while to sort it out and didn't want to waste loads of time being stuck.

The basic form was complete.

Extruding the face to create the neck obviously the size was to big, when I tried scaling it down the vertices would tear along the centre where the modle split and was mirrored. I resolved this problem after quite a while. I had to click on the vertices and push them along the x axis this worked out with out any tearing.

I then thought everything was ok until I noticed a big split in the head.
I resolved this by redoing the head neck and head when i clicked the cicle on the x,y,x axis it altered the angle so when i extruded the faces which made the head. It would extrude directly up instead of an angle and this caused the head not to split.

The character was taking shape.


The duplicate special would enable me to work on a single side of the model and every action I performed would be mirrored which would save time.

Before I began modeling I had messed up the image plains. I think some how I had linked the polygon to the image plain. so as I zoomed in to the polygon the image plain would disappear.

I figured out the problem I just began again and followed the steps this time it worked the image plains were locked and the polygon was behaving normally.

I began shaping the Torso navigating between the different perspectives, I usually match the model up with the front image and then side, while also checking the perspective mode. No problems so far. I had previously messed around with vertices while attempting to model a face so i understood in basic terms how they worked through the xyz axis.

I selected the two faces on the bottom left and right side of the torso then extruded them to make the basis of the thigh.

I then extruded the face down to the foot, each time I extruded a knew edge and set of vertices were created. I used the side and front shot to align the model with the image plain. I further extruded the faces to make the basic feet.

Inserted two extra edge loops in the chest, Edge loops allows you to add further shape to your model, it also wraps around the whole model unlike split polygon tool.

Using the faces again I extruded to create the arms, The angle was wrong so I altered the vertices. maybe I should have used the rotate tool instead of the vertices but I'm more comfortable doing it like that.

Extending the arm by extruding and matching it up with the reference.

Here is were I ran into some problems, the book explained the way in which the arm twists which it naturally does, however I couldn't quite match my arm model with the book reference. I tried my best but felt this wasn't quite right. I spend ages thinking what was wrong in the end I manipulated the vertices but still feel it wasn't the correct way to do it. I added in extra edge loops to form the fingers and to add more detail to the arm.

Creating more split polygons I was able to extrude the fingers. To the largest knuckle to the smallest. I could tell something had gone wrong the hand looked slightly like my reference but it wasn't perfect and I will have to go back to this at a later stage. I scaled down the face at the end of the finger to gain the right proportion.

Following the book I selected a single face and extruded it until it made a thumb. I could tell that it wasn't quite right but wanted to carry on and return to the mistakes after more progress had been made. I did try for a while to sort it out and didn't want to waste loads of time being stuck.

The basic form was complete.

Extruding the face to create the neck obviously the size was to big, when I tried scaling it down the vertices would tear along the centre where the modle split and was mirrored. I resolved this problem after quite a while. I had to click on the vertices and push them along the x axis this worked out with out any tearing.

I then thought everything was ok until I noticed a big split in the head.
I resolved this by redoing the head neck and head when i clicked the cicle on the x,y,x axis it altered the angle so when i extruded the faces which made the head. It would extrude directly up instead of an angle and this caused the head not to split.

The character was taking shape.

Referring to the book and my image reference I made the head look more like the characters adjusting the vertices by pulling them back wards and forwards.

I then began creating more edge loops to give the character a more organic shape, I was reminded to shape the vertices after adding them.

I had pushed the vertices in from the central line down the body, I may have cut in a bit to deep as the definition was a bit much. One thing I need to learn with modeling is how to evenly adjust the vertices.

This screen shot show how I have pushed in and out the vertices to form the back.

When I was trying to make the character more organic and less square I started to ignore the image reference. When I refereed to the image plain, I realised my shape was quite wrong I then adjusted it back to the reference image. By adjusting the vertices.

I had inserted a lot more edge loops and adjusted them to the image.

The legs still needed work but I tried to make them fit round the leg more. I also tried to adjust the vertices around the crotch as sown in the book.

I rushed of a head and tried to shape the gluteus maximus, but later discovered I was meant to pull out the faces. I need tow ork on this further to correct the shape.

The character more developed.

back ond body more defined.

Polygon detail.

Character so far.
First steps
I felt it was a good idea to go back to the basics. So I spent some time familiarizing my self with the Maya system, I'm using the latest version of Maya, Maya 11 which seems more user friendly. I generally prefer the colour scheme it looks slightly less threatening.
I reminded my self of the xyz system , of Maya which identifies the way in which you navigate your models around. X being the horizon line, Y being the vertical, and Z being the line which cuts between the two which gives you the 3.D depth. I know this is really basic stuff but I very unfamiliar with the system and have never really got into it even on this course.
I began reading the book from the beginning which went over preferences, to make sure the scene was set up correctly by default my setting were fine and I was ready to begin with my reference image.

 Previously I have read and tested the importance of setting up an image plain.
Its important to get the sizing wright for he front and side profile so they are properly measured and placed correctly, as the two D template will act as a solid guide for your model.
1. I inserted the image planes in to the side and front perspective.
2. In the channel box / Inputs I clicked - 25 in the centre Z which put the image plain into the correct place. I did the same with the the side view.
3. Once I had the two images in the right place I created a new layer and assigned the two image plains tow this layer then clicked in the middle box of my layer until it turned R, this mean I couldn't accidentally start moving the layers about when modeling.
4. Time to block out the character, creating a rough frame, like a sketch but in 3.D.
I reminded my self of the xyz system , of Maya which identifies the way in which you navigate your models around. X being the horizon line, Y being the vertical, and Z being the line which cuts between the two which gives you the 3.D depth. I know this is really basic stuff but I very unfamiliar with the system and have never really got into it even on this course.
I began reading the book from the beginning which went over preferences, to make sure the scene was set up correctly by default my setting were fine and I was ready to begin with my reference image.


Its important to get the sizing wright for he front and side profile so they are properly measured and placed correctly, as the two D template will act as a solid guide for your model.
1. I inserted the image planes in to the side and front perspective.
2. In the channel box / Inputs I clicked - 25 in the centre Z which put the image plain into the correct place. I did the same with the the side view.
3. Once I had the two images in the right place I created a new layer and assigned the two image plains tow this layer then clicked in the middle box of my layer until it turned R, this mean I couldn't accidentally start moving the layers about when modeling.
4. Time to block out the character, creating a rough frame, like a sketch but in 3.D.
My Tasks in this unit.
I may not decide to go into modeling in the future, as I still find illustration and the designing stage of characters more intersting. However It is important to not just have one skill and by learning new skills it could improve my chances of employability.
In the past I have done some modeling and have found it very difficult, and wanted to take this opportunity to improve.
I used the Book Character Modeling with Maya and ZBrush. It proved more difficult then video tutorials when you can simply copy step by step, but it was definitely more beneficial for me and I learnt more from reading this book.

I used the Book Character Modeling with Maya and ZBrush. It proved more difficult then video tutorials when you can simply copy step by step, but it was definitely more beneficial for me and I learnt more from reading this book.
Aims of This Unit
Aims of this unit.
- To improve on skills previously learnt in previous terms.
- To learn and develop new skills.
Subscribe to:
Comments (Atom)